If you have access to an interactive whiteboard, such as a SMARTBoard, and want to try something a little different, you might want to try your hand at creating a themed-based "mash-up" for students. The photo below is a screen shot of photos of just about every dog I know, and some that happened to cross my path. In this post, I'll share some information about how to create a photo-globe in Google Earth. I'll post a "how-to" video in the future.

The first step is to make sure you have lots of pictures related to your theme uploaded to a site such as Flickr. (You can also create a photo-globe using pictures from your computer's hard drive.)
To get the pictures into Google Earth, I used the Image Overlay feature, and in the "link" textbox, I entered the image URL for each picture that I'd previously loaded as a set in Flickr.
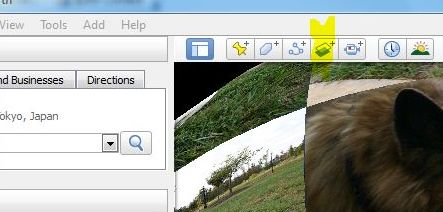
To do prepare for this, make sure you go to "view" tab on the upper left-hand section of your screen, and make sure that "toolbar" is checked. Also make sure that "Grid" is selection, as this will help make it easier to arrange and align your pictures. You can turn off this feature later. Near the top of the screen, click on the Image Overlay icon. (I've highlighted it in the picture.)

You'll have to enter the URL of the image you'd like to add to the globe in the "Link" textbox, which I've highlighted in the above picture. In this case, I've used a link to one of my pictures in a Flickr set I created for this project.
One thing to keep in mind is that the picture will take up a much larger space than you might prefer, so you'll have to adjust the size using the green markers:
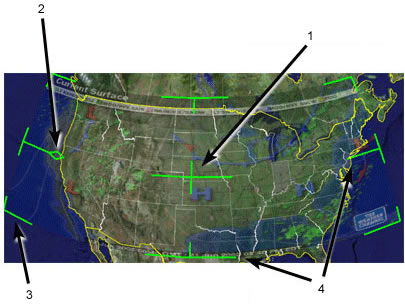
The following directions are from the "Positioning the Imagery in the Viewer" section in the help section:
- Use the center cross-hair marker to slide the entire overlay on the globe and position it from the center. (Tip: do this first.)
- Use the triangle marker to rotate the image for better placement.
- Use any of the corner cross-hair markers to stretch or skew the selected corner. If you press the Shift key when selecting this marker, the image is scaled from the center.
- Use any of the four side anchors to stretch the image in or out of from the selected side. If you press the Shift key when doing this, the image is scaled from the center.
TIP: Try positioning the center of the image as a reference point first, and then use the Shift key in combination with one of the anchors to scale the image for best positioning.
In Flickr, to get the image URL, go to the "share this" tab above the picture you'd like to put on the globe. You need to select the one that says "Grab the HTML", as shown below:

Select ONLY the code that comes after "src=" and before "width".
Then repeat. You can add place-marks that contain URLs that link to additional information about the subject of a picture, such as blog posts with embedded videos and/or text related to a picture, and so forth.
The process of building a photo-globe in Google Earth is a bit tedious. If someone has a short-cut to share, please let me know!
TAG GALAXY - A "shortcut":
If you have a burning desire to create a quick photo-globe using random pictures, you see what the Tag Galaxy has to offer. Enter "dogs" or whatever theme you want for your photo-globe, and in an instant, it will be created from publicly available pictures from Flickr. The application uses the Flickr API.
Here is an example of a "Dog" Tag Galaxy:

Here is the slideshow from the pictures selected for the photo-globe:
Why is this important to me?
The students at one of my schools started back last week, due to the school's "year-round" schedule. The students in this program have multiple special needs, including severe autism, and most learn best through visual and multimedia representations of information. I devote some of my spare time creating interactive content for the students, and I thought this might work out nicely.
To address the student's special learning needs, a number of new SMARTBoards were recently installed at the school, and now every classroom has an interactive whiteboard, including the room I usually use with students. We also have a few Dell Studio One All-in-One touch screen computers and a multi-touch SMARTTable. Interactive multimedia content works nicely on these screens! (I'm planning on making a "how-to" video when I get the chance.)
RESOURCES
Google Earth
Flickr
Programmable Web (My hunch is that this site might provide some information about shortcuts for creating a photo-globe in Google Earth.)
(Cross posted on the Interactive Multimedia Technology Blog)


No comments:
Post a Comment